There are 2.64 million apps on the App Store and another 2.58 million on Google Play, according to 42matters’ store data for September 2026. Most of them are invisible. On iOS, 62% have never received a single rating; on Google Play, it’s 54%.
That’s the real backdrop to any question about how to launch an app. Getting into the stores is the easy bit. Getting found, getting kept, and still being maintained two years later is where most products stall — usually because something unglamorous was skipped months earlier. We see the same gaps in our own mobile app development services work, and almost none of them are about code.
This guide is for teams taking a mobile app to market: product owners, CTOs, and founders at enterprises and funded startups who’ve already decided to go ahead. It covers 20 steps in six stages, from idea to store to mobile app launch and the ownership that follows.
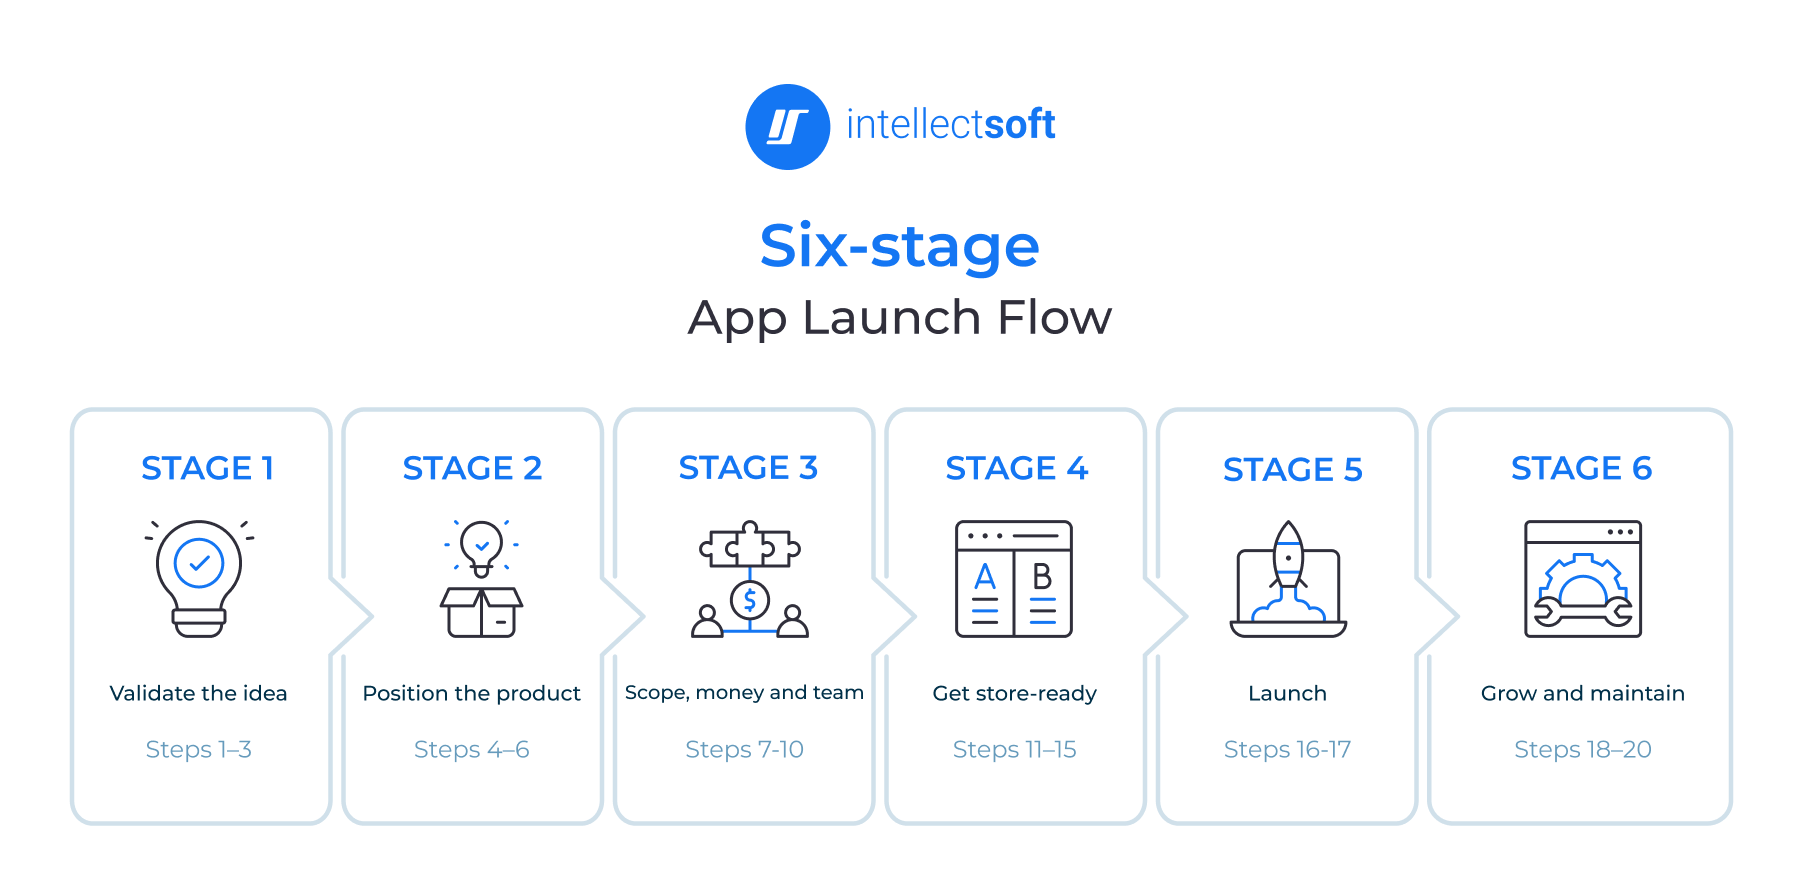
Stage 1. Validate the idea
The first three steps cost almost nothing and decide whether the rest is worth paying for.
Step 1. Define the problem and who has it
Many developers not only forget to start from problem identification — they disregard this step completely. By doing this, they make one of the biggest mistakes ever: they face the failure of an overall initiative to launch an app.
That’s why we recommend that each team consider the problem-solving approach seriously. Before you let your mind get captured by your brilliant ideas, or start working on the product itself, calm yourself down by asking, “Which customer pain do I want to solve?” This simple mental exercise can direct your efforts from making another useless app to something worthy and needed by people.
While identifying customer pain, stick to the basic principle of thinking big and acting small. That will help you accumulate all the necessary experience and suffer minimal losses.
Once you’ve defined the customer pain, it’s time to brainstorm ideas. At the very beginning, try to gather as many bad ideas as possible. Aim at reaching 100 points in your list of terrible solutions — usually, the great idea appears somewhere between the 20th and 80th position. When stuck, investigate forums and thematic groups on social media, and test your ideas while talking to those facing the identified pain.
When you’ve finally picked a couple of great ideas, scrutinize them by asking these questions:
- Which actions can lead your product to come into the market?
- What makes your solution special?
- Why should people download your app?
- Are you able to develop a sustainable business plan to make it work?
- Is it easy to steal and/or copy your idea? How can you protect yourself from this harm?
If your idea can stand such interrogation under duress, you can move forward.
Then one last test. Write down what the app does and who it’s for, in one sentence:
[Product] helps [specific group of people] [do a specific thing] so they can [outcome].
If the team can’t produce it, or three people write three different versions, the launch has no message, and the store listing has no subtitle.
Step 2. Validate before you build
Create a low-tech prototype you can touch and test. It doesn’t have to be detailed — just enough to check whether everything on your idea checklist can take the shape of a working app. How far to take it depends on the difference between a PoC, prototype, and MVP.
A prototype shows the idea holds together. Whether anyone wants it is a separate question, and three cheap checks answer it.
A smoke-test page with a waitlist. One page describing the app as if it exists, one email field, a few hundred dollars of targeted traffic. Stop signal: under 5% signup after two headline rewrites. Keep this page — it becomes your marketing landing page in Step 15. Publishing it this early is deliberate, since it gets months to be indexed and the list gets months to fill.
Eight to twelve problem interviews. Talk to people who have the pain, not people who like your idea. Ask what they do about it today and what that workaround costs. Stop signal: ten interviews in, nobody has built a workaround of their own.
A search-demand check on store keywords. Run your customers’ likely search terms through a keyword tool. Stop signal: every term is near-zero volume, or owned by three entrenched apps with huge download counts — which leaves paid acquisition as your only channel.
Two failed checks are a stop. Kill or reshape the idea while the sunk cost is a landing page and some interview time.
Step 3. Size the market and read the competition
Market research and competitor analysis are one activity here. In app stores, the market is the set of apps ranking for your keywords.
The category context is public. Consumers spent $167 billion on apps in 2025, and for the first time more went to non-game apps than to games, according to Sensor Tower’s State of Mobile 2026. Your niche: you’ll have to size yourself. Use Google Keyword Planner and tools like Sensor Tower or Appfigures, take your main store keyword, and pull the top 10 apps ranking for it. That list is your market and your competitor set at once.
For each app, ask:
- Who are their target users?
- Why are they so popular?
- Which exact keywords make their ranking that high?
- What do customer reviews say?
- What did they overlook, and so your product can improve on?
Note how many shipped an update in the last 60 days, too. Half the top apps untouched for a year means the category is dying or undefended.
Question four deserves an afternoon. Filter each competitor’s reviews to one and three stars, read 30 to 50 per app, and copy out every complaint. Then count what repeats. Sync that breaks. A card is demanded before anything is shown. An export that won’t work. Complaints landing against all 10 rivals are your feature backlog and your positioning gap in one pass — and three-star reviews, written by people who actually use the app, tend to be the most precise.
Stage 2. Position the product
Step 4. Build the user persona
In addition to understanding the market, it’s essential to know your customers well. Spend a fair amount of time learning their demographic traits, tastes, typical behaviors, and attitudes. All this data will make your users attracted to the product you’ll create for them.
After you’ve collected all the relevant information, create the user persona. This method makes you think of an ideal customer — the one who contains the most typical features and reveals the most common patterns you’ve identified.
Here’s the process for working on a user persona:
- Include raw data: age, location, occupation, relationship status, etc.
- Draft a typical bio to create the story of your user persona.
- Add sections with wishes, needs, and common fears to capture the emotional portrait.
- Include relevant skills and specifications.
- List favorite brands, food, and places (or any other details relevant for your research).
One more field worth adding: the exact words this person would type into a store search. Those phrases become the seed list in Step 14.
Step 5. Write the positioning statement and value proposition
Once you’ve convinced yourself and your market that an idea should see the world, it’s time to start marketing. The proper start is a positioning statement that addresses three main questions:
- Who will use my app?
- What advantage does it bring to these people?
- Why is this app more valuable to my users than all the other apps available?
Every marketing step you take afterward should reinforce that statement — again and again. Dedicate maximum attention to your value proposition: the phrase that hooks your target audience and convinces them to stay. Filled in, it reads like this: for field supervisors who still close out jobs on paper, [Product] captures the sign-off on site and syncs it to the office before the crew leaves — no re-keying.
Your strengths come from two places. The complaints that repeated across all 10 rivals in Step 3 are, stated positively, what you do better. And channels your rivals leave empty — nobody answering reviews, nobody shipping a web version — are openings you can take without outspending anyone.
Now, the constraint that kills most positioning. The App Store gives you a 30-character subtitle; Google Play an 80-character short description. So your value proposition needs a 30-character version, a one-line version, and a paragraph version that all say the same thing. Write the short one now, not the week you submit.
Step 6. Choose a monetization model
How you ask for money depends on what the app does and how often people open it.
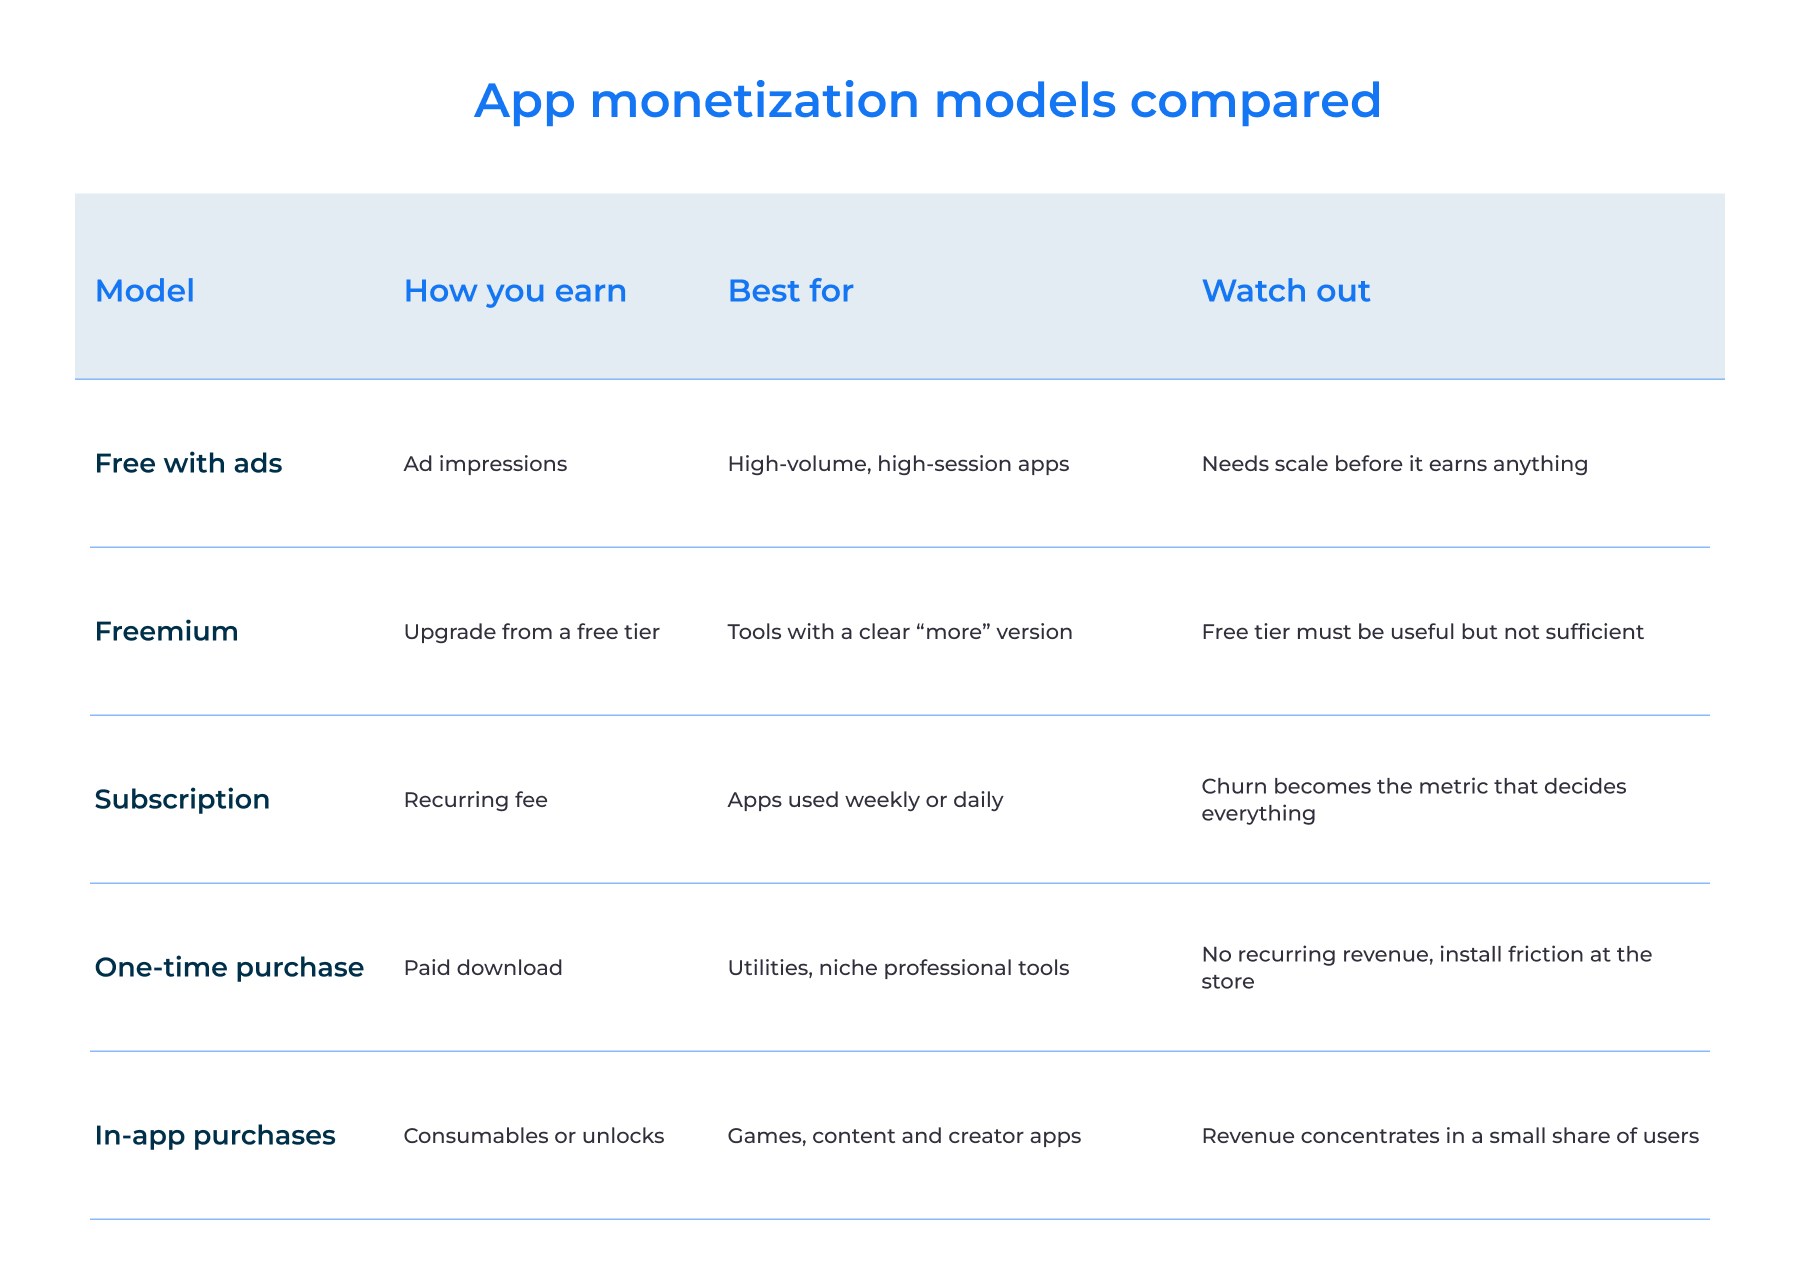
The decision rule is simpler than most teams make it: the model has to match usage frequency. When the user opens the app more than several times a week, the subscription is justified since they get the value back before each renewal. However, if they open the app twice a month, the subscription seems like a waste of money, and the user cancels it. Products that are used rarely provide more value when bought once or have a one-time payment option available.
Pick it now. The model is configured in App Store Connect and Google Play Console before submission — product IDs, price tiers, tax categories — and changing it after release means new IDs, a migration path, and another review. Step 13 covers what the stores need.
Stage 3. Scope, money, and team
Step 7. Set the budget and the timeline
Ask what an app costs, and someone will say $30,000. Someone else will say half a million. Price the three drivers separately, then set the budget.
Scope. One user role and a handful of screens is your floor. Roles, an admin panel, payments, offline mode, or an ERP integration nobody has documented since 2014 each add weeks — and integrations you don’t control are the line that most often doubles a budget.
Platform count. Two native apps don't cost twice as much as one, since design, back end, and QA are partly shared — but they still mean two codebases to write and maintain. Cross-platform mobile development narrows that gap further: teams typically share 60% to 95% of their code between iOS and Android, according to JetBrains' Kotlin Multiplatform documentation.
Team model. In-house, dedicated team, or fixed-scope contract changes both the rate and how much risk sits with you. Step 8 covers the choice.
Money and time move together here. Anything that raises mobile app development cost — an extra role, a second platform, an undocumented ERP — usually changes how long it takes to make an app by the same proportion.
Months 1-2: discovery, architecture, design. Months 3-5: development, with QA running alongside. Month 6 and on: beta, compliance, store assets, submission. Store review adds days, not weeks — but a rejection adds a whole cycle, so plan your date with one built in. Where you are in the startup lifecycle changes the tolerances, too.
These ranges are planning aids, not quotes. Only a discovery phase turns them into a real number for your project.
Step 8. Choose your build path: in-house, outsourced, or no-code
Most comparisons of how to staff an app stop at cost versus speed. The harder question is what each path leaves you holding in month 18, when the original team has moved on, and something breaks at 2 am.
Hiring in-house. You own the code, the knowledge, and the payroll — usually right when the product is the business. But recruiting a mobile lead, engineers, a designer, and QA takes three to six months before anyone ships, and the workload drops after release while the salaries don’t.
Outsourcing or a dedicated team. You get an assembled team in weeks, with senior architecture experience included. A fixed-scope contract suits work you can specify completely; a dedicated development team suits scope that moves as you learn, which describes most app work. Ask who owns the repository and the store accounts, and what handover looks like. Teams that outsource app development without asking usually get the answers during their first outage.
No-code and low-code. Right for internal tools, standard flows, or pure validation — live in weeks, for a fraction of the money. It stops working at four walls:
- custom integrations with legacy systems and undocumented data models
- offline behavior that has to survive a lost connection mid-write
- store-grade performance on older devices, big lists, camera, and background work
- compliance — data residency, audit trails, a pen test someone will sign
Migrating off it later is a rewrite, not a port.
Four variables usually settle the choice. How fast you need to be live (under three months rules out hiring). What your team has already shipped and maintained. How much the app will change after release — great change favors a long-running team. And what has to be proved to an auditor: HIPAA, PCI DSS, or GDPR residency can eliminate options outright.
Step 9. Design the UI, UX and onboarding
Start with a sketch of the app: the main blocks, how they connect, the basic flow — no colors, no detail. Then a clickable prototype, which answers a different question: can someone get through it without being told what to tap? Test it on five people who’ve never seen the app. Then the visual design, where every pixel and state matters and a professional earns their fee. Good UI & UX design services treat it as a discipline of its own, with research and usability testing, not a coat of paint at the end of development. Price it as a separate line, too: app design cost scales with the number of screens and states, not with how polished the mockups look.
But the part that decides retention is onboarding.
Most people who install a mobile app open it once. The standard first minute is hostile: a tour nobody reads, a notification prompt before anything exists to notify about, then a signup wall. Flip it. The first screen delivers one clear win before it asks for anything — no permission prompt, no account wall, no tour.
Let someone search, scan, or see their own data first. Ask for notifications when they set their first reminder. Ask for an account when they have something worth saving. Then track how many reach that win, and where the rest drop off.
Step 10. Build the MVP
The costly mistake in an app isn’t bad code. It’s code for features nobody has asked for yet.
So scope the MVP with one test: the first version is the smallest release that lets a real customer complete the core job end to end. Everything that job depends on ships. Everything else waits. If the job is “a technician logs a repair, and the office sees it,” the login, form, photo, sync, and office view ship. Profile settings, charts, and a second language don’t.
A few decisions are cheap now and expensive in month nine: platform count, native (Swift, Kotlin) versus cross-platform (React Native, Flutter), and your data model. Settle your mobile app architecture before the first sprint, not during the third. If you want scoping and delivery as one engagement, that’s what our practice for building a minimum viable product does.
One hard limit for enterprise and regulated teams. Feature scope is negotiable; security and data handling are not. An internal or regulated app still has to clear security review, with encryption, access control, audit logging, and retention correct in version one. Cutting those to move faster reliably makes you slower.
Stage 4. Get store-ready
These are the steps competitors’ guides skip, and the ones that move release dates.
Step 11. Instrument analytics and attribution before you ship
Measurement can’t be retrofitted. Add analytics a month after release, and it counts from that day — the people who installed in week one and left are gone, and you can’t ask a churned cohort why it churned. So the app version that goes to the store already measures.
Have four things working before submission:
- install source — which channel and campaign produced each install, through an attribution tool like Adjust, AppsFlyer, or Branch
- one activation event — the moment a new person first completes the core job. Installs measure your listing; activation measures your product
- day-1, day-7, and day-30 retention, cohorted by install week
- the action that predicts staying — found by comparing what 30-day survivors did in week one with what churned users did
Add crash reporting and in-app messaging from day one. And make sure your consent prompts and privacy declarations match what these SDKs collect — Step 13 explains why.
Step 12. Run a beta test — and consider a soft launch
The more features and platforms your product needs, the more a beta matters. Teams that launch mobile app products without one tend to learn about their bugs from one-star reviews, and a broken first impression is hard to undo. But skip the friends-and-family round as your main source — they catch crashes and are too polite about everything else.
Recruit 20 to 50 external testers from the Step 2 waitlist and the communities you found in research; more if you have several user roles. Run two rounds over two to four weeks, so the second one proves the fixes from the first. Watch crash-free sessions, the onboarding drop-off point, how many reach activation, and testers who install and go quiet.
On iOS, TestFlight handles internal and external testing. Google Play offers internal, closed, and open testing tracks. Both let you push new versions to testers without a full review.
A soft launch is different. A beta asks whether the app works; a soft launch asks whether the business works. You release publicly in one or two smaller markets — Canada, Ireland, or New Zealand are common picks — with real payments and ad spend, and watch day-7 retention, cost per install, and conversion for four to eight weeks. Consumer products that live on paid acquisition need it. An internal enterprise tool doesn’t.
Step 13. Set up developer accounts, privacy and compliance
Start this when the app is still in development. It’s the most common reason a release date slips by a fortnight.
Apple’s Developer Program costs $99 a year; Google Play Console is a one-time $25. But the fee isn’t the problem — organization verification is. Apple needs a legal entity, a D-U-N-S number, and a matching website, and getting a D-U-N-S number alone can take a week or two. Google runs comparable checks. Enroll under the company, never an employee’s personal account.
Rejections cluster around a short list:
- incomplete or inaccurate metadata, including screenshots that don’t match the current version
- demo account credentials that don’t work on review day
- a missing privacy policy, or a dead link to one
- data collection you didn’t declare
- payment flows for digital goods that bypass store billing (rules vary by market now — check current guidelines)
The declarations are where teams get caught. Apple’s App Privacy details and Google Play’s Data safety form are both mandatory and both checked against what your binary actually does. An analytics SDK collecting an identifier nobody accounted for reads as misrepresentation, not oversight. So audit every third-party library first. Store reviewers only check the declarations. Enterprise buyers check mobile application security end to end: encryption, credential storage, session handling.
Launching an internal or enterprise app
A workforce app skips the public store. Apple Business Manager distributes custom apps privately to specific organizations, and Google Play supports private apps on managed accounts, usually delivered through an MDM platform such as Intune, Jamf, or Workspace ONE. That removes public ASO and reviews from strangers. It doesn’t remove reviews, the privacy declarations, or the security work — your own security team will usually want a pen test, SSO, and a named incident owner before anything touches a corporate device.
Step 14. Optimize the store listing and creative (ASO)
Start from the persona seed list in Step 4. Ranking elements, roughly by weight:
- App name — the heaviest signal, 30 characters on iOS
- Subtitle (iOS) or short description (Google Play) — where your 30-character value proposition lives
- The iOS keyword field, or the Google Play long description
- Ratings and download velocity — both stores favor apps people install and keep
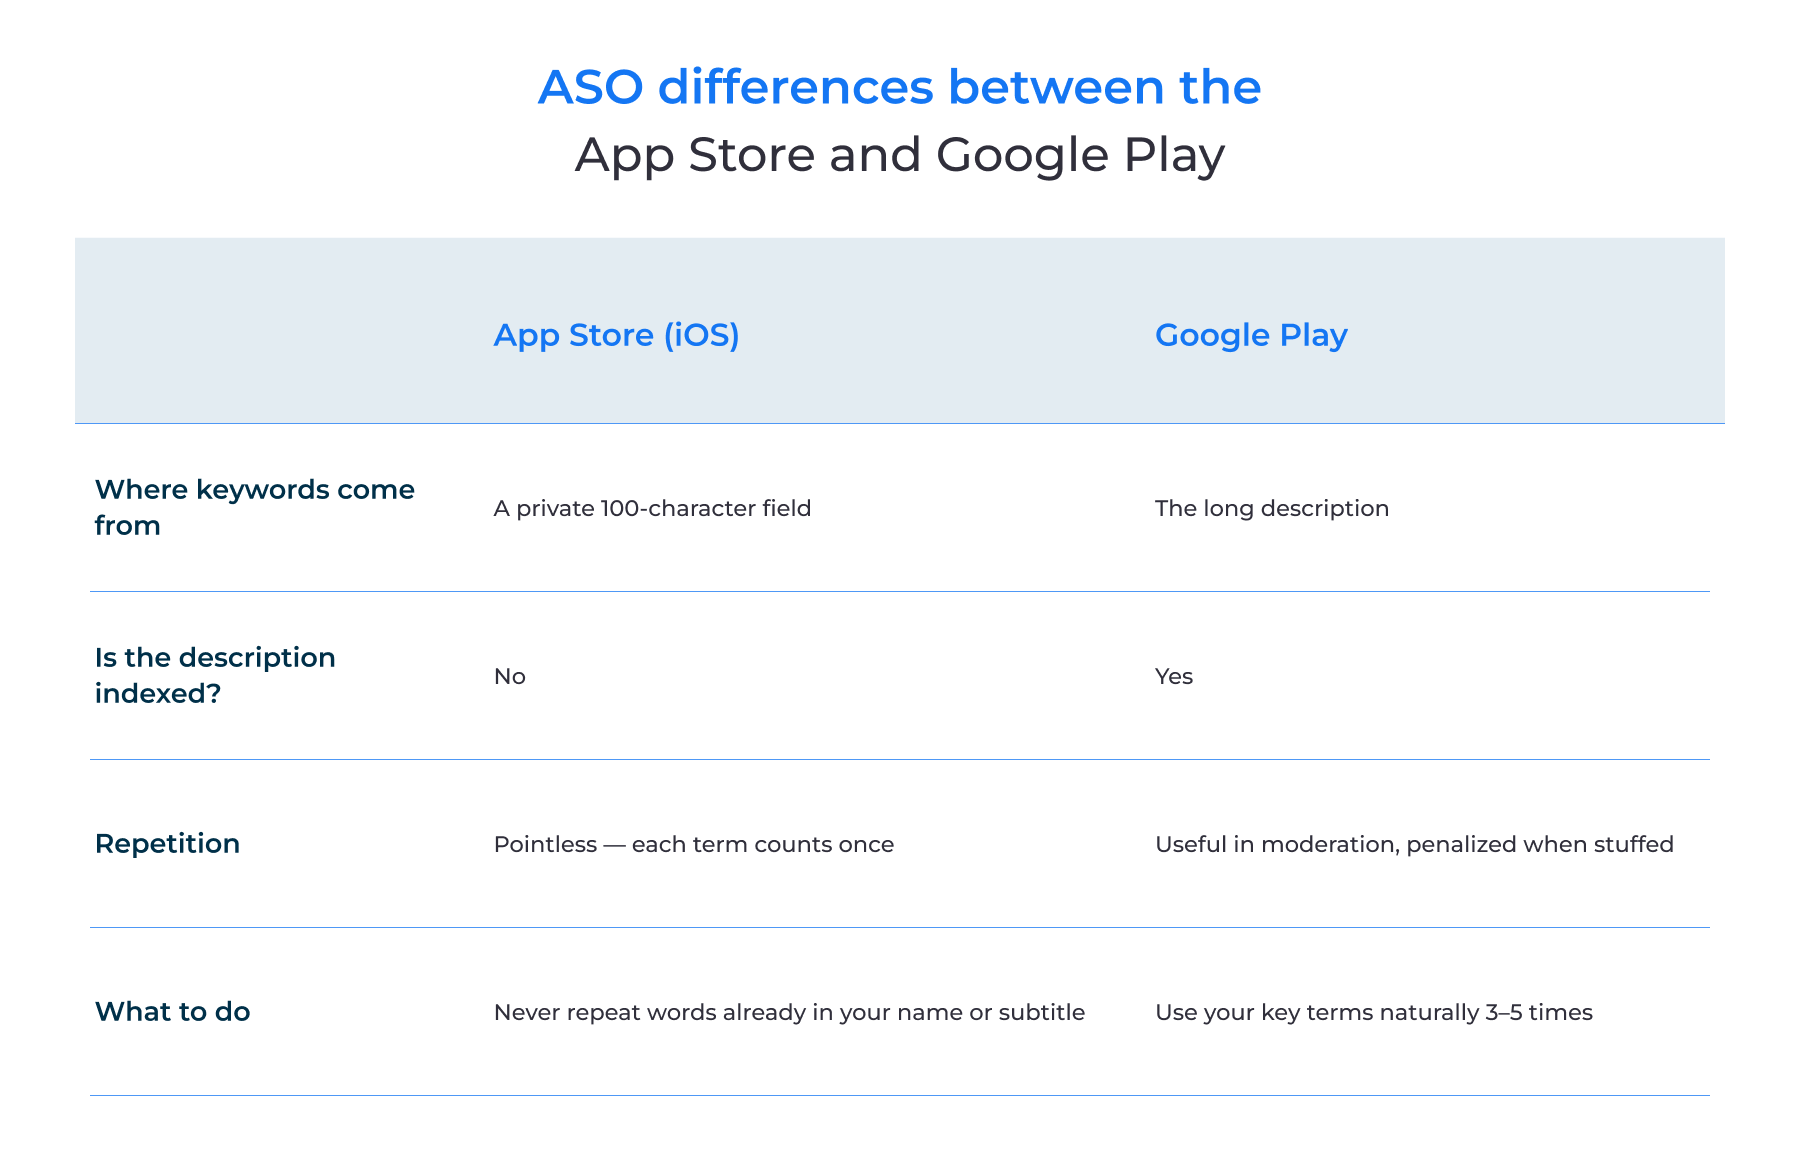
Item three is where most teams go wrong, because the two stores index text in opposite ways.
On creative: most people never scroll, so the icon and first two screenshots are the whole pitch. Put the value proposition on those two, readable at thumbnail size. Test a preview video rather than assuming it helps. Keep the icon legible at 60 pixels.
Step 15. Build pre-launch demand
Timing is the point of this step: the landing page goes live during development, not in launch week. It needs time to be indexed, and an email list needs weeks to fill. A page published three days before release ranks for nothing and has nobody on it on launch day.
It’s the same page as the Step 2 smoke test, upgraded. Back then it had one email field. Now it includes screenshots, the video, and store badges. One page, published once.
Until the store links exist, keep it to three things: the one-sentence statement from Step 1, one screenshot or a 30-second video, and one email field.
For audience, go where it already gathers. The forums, subreddits, and professional groups from your research hold people with the problem right now — show up as a participant, not a billboard.
Press needs three to four weeks of lead time; a pitch sent on release day gets ignored. Give journalists one linkable press page with the description at three lengths, full-resolution screenshots, the icon, and an email that reaches a human on deadline.
Stage 5. Launch
Step 16. Submit the app and pass review
You upload the binary through Xcode or Transporter for iOS, and as an app bundle in Play Console. Around it goes the metadata, screenshots for every required device size, support and privacy URLs, and the declarations from Step 13. Then the item app teams forget: working test account credentials with real data in them.
According to Apple, 90% of submissions are reviewed in less than 24 hours on average. Google Play publishes most updates quickly, but warns that some developer accounts get extended reviews of up to seven days. A rejection is what costs real time.
When one arrives, read the specific guideline cited and fix only that. Rewriting three unrelated screens to look cooperative just gives the next reviewer more to question. If you think the reviewer misread the app, reply in the Resolution Center with a screenshot or a short recording instead of resubmitting blind — those replies get read.
Then release gradually. Phased release on iOS rolls out over seven days from 1%; staged rollout on Google Play lets you set the percentage. Going to 100% on day one means a bad version reaches everyone at once. At 1%, the same crash hits a few hundred people, and you can halt it.
Step 17. Launch day: coordinate every channel
It finally happened. Open the champagne — then put it down, because coordination matters more than celebration.
Everything in your app launch fires on the same day: the waitlist email, press, community posts, paid campaigns, and the store release. Here’s why. Download velocity — installs in a short window, not in total — feeds how both stores rank you. A thousand installs spread over two weeks is a flat line. The same thousand in 48 hours is a signal, and the stores show you to more people in response. Scatter your channels across a week, and you give that lift away.
Launch-day checklist
- Store listing live on both platforms and searchable by app name
- Analytics and attribution confirmed firing on a real install
- Support inbox monitored and a response template ready
- Announcement email sent to the waitlist
- Press and community contacts notified with live store links
- Landing page switched from waitlist to download links
- A named person watching crash reports for the first 24 hours
- A rollback or hotfix path agreed before you need it
Stage 6. Grow and maintain
Step 18. Monitor the metrics that matter
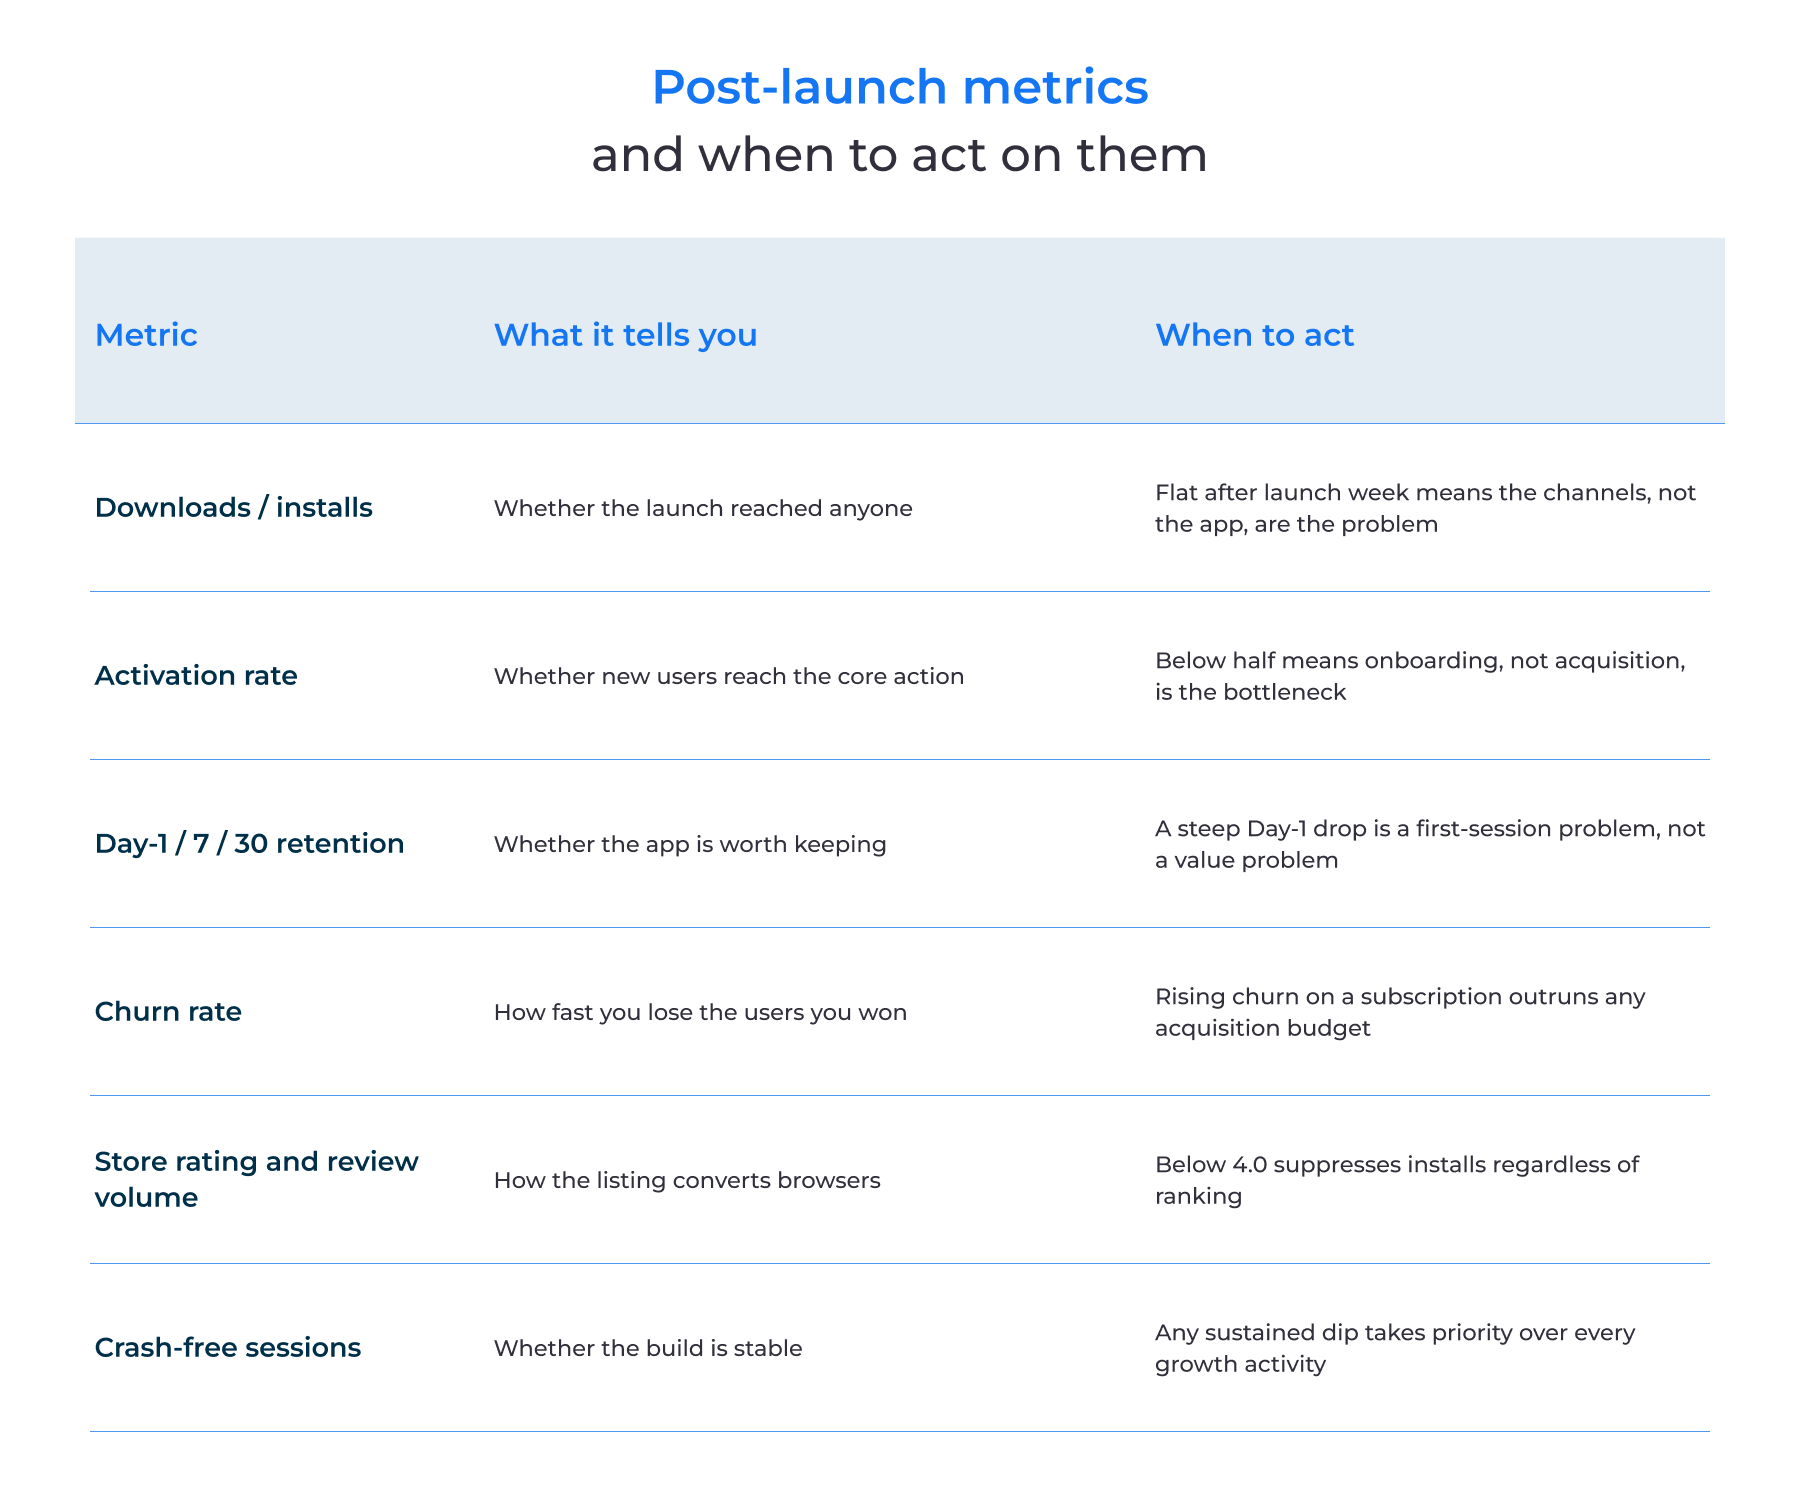
In the first weeks, check performance daily and expect ranking to swing. Just watch the right number.
Downloads flatter every app. An install costs someone four seconds and tells you a channel worked — nothing more. Retention is the number with your business, and your budget, in it. An app keeping 30% of users at day 30 compounds; one keeping 5% has to buy its audience again every month, at rising prices.
Around week two, go back to the listing. You can now see which search terms actually delivered installs. Revise the title, keyword field, and description to match, one change at a time.
Step 19. Turn reviews and feedback into the first update
App reviews tell you what’s broken, and they decide whether the next browser installs.
Timing the prompt is most of it. Never on first open — the person has nothing to rate. Never mid-task. Ask after a success moment: the first job done, the third session. Both platforms cap how often you can prompt, so treat it as one shot per person.
Reply to negative reviews in public. The complainant is rarely the real audience; the browsers reading your listing three weeks later are. A developer who answered each complaint and named the version with the fix converts them.
And ship a visible update within the first few weeks, even a small one. Both store algorithms weight recency, and “Updated three days ago” tells a browser that someone is still home.
Step 20. Retain users and plan ongoing ownership
Never forget the people who already chose to stay. Keep an eye on their behavior, react to what they tell you, and keep solving the problem you set out to solve in Step 1.
Push notifications. The permission prompt is a one-time asset. Ask when a notification would obviously help — they’ve set a reminder, followed a thread — not on first open. Frequency does the rest. Notifications tied to something the person asked for can arrive daily. Ones serving your engagement numbers wear out in about three sends, and that’s the fastest route to being switched off or uninstalled. A useful test: would they be annoyed to have missed it?
The retention loop. Take the action that predicts staying, from Step 11, and redesign onboarding so more people reach it faster. Measure, then repeat with the next bottleneck.
Ownership. Here’s the part no other app launch plan covers. Released isn’t finished:
- OS upgrades break things every year, and someone has to test against the betas
- store policy changes force resubmission, on deadlines you don’t set
- SDKs deprecate, sometimes on a date they choose
- a crash spike on a Saturday needs somebody on call
So ask it plainly: who on your team does this, and what else are they meant to be doing that month? If the honest answer is “nobody in particular,” pick one of three arrangements that work — a named internal owner with protected time, a support agreement with whoever wrote the code, or a dedicated development team that stays on after release. Decide during development, while it’s a contract line rather than an emergency.
Common app launch mistakes
- No analytics in the shipped version. Three weeks in, nobody can say which channel brought the paying customers — and that first cohort is gone for good.
- Treating submission as paperwork. The rejection lands two days before your booked campaign, over expired demo credentials.
- Writing the store listing last. Drafted the night before submission, it ranks for nothing and stays that way for a year.
- Releasing to 100% at once. A payment-flow crash reaches everyone before anyone checks a dashboard.
- Measuring downloads instead of retention. The install chart looks great while 80% of those people never return.
- No owner after launch week. Something breaks on a Saturday, and the one-star reviews arrive before anyone reads the crash report.
Launching your app with the right team
The app launch plans that work aren’t the loudest. They follow the same steps in the same order. They’re the ones where store readiness, compliance, and measurement were finished before release day. Release-day noise amplifies whatever you’ve prepared; it doesn’t replace it. That’s the real answer to how to launch an app that lasts.
Intellectsoft has worked with enterprises and funded startups since 2007, and our portfolio includes Fortune 1000 companies. Every engagement gets a senior architect from day one and opens with a systems-design sprint, because the decisions that make an app expensive to own are made before anyone writes code. That's how we run mobile app development services across the whole path in this guide, from scoping to ownership after release. The results, industry by industry, are in our case studies.
Planning to launch your app this year? Book a consultation, and we’ll walk through your scope, timeline, and what it takes to keep it running after release.
FAQ
How do you launch an app?
Validate the problem, develop and test the app, get the store and measurement work done, then release and keep owning it. Most of the pain lives at the two ends. Teams skip validation because they’re impatient, and skip ownership because nobody budgeted it. Release day itself takes an afternoon.
How long does it take to launch an app?
Plan for six to nine months on a mid-sized mobile app. Roughly two months go to discovery, architecture, and design before anyone writes production code, four to development and QA, and the rest to beta, compliance, and submission. Regulated work runs longer. Whatever date you pick, assume one store rejection.
How much does it cost to launch an app?
It depends on three things, and a headline number hides all of them. Scope is the big one — roles, payments, offline mode, and integrations with systems you don’t control each add weeks. Two platforms cost about 60 to 80% more than one, not double. Staffing model changes the rest.
What do you need before submitting an app to the App Store?
More paperwork than code, honestly. You need the $99 Developer Program membership, an uploaded binary, and metadata that’s complete down to screenshots for every device size. Then a live privacy policy, App Privacy declarations that match what your SDKs really collect, and demo credentials that still work on review day.
How long does app store review take?
Apple usually comes back within 24 hours. Google Play takes a few days, and longer if your developer account is new and still being checked. Neither number is what delays releases. A rejection does, because it costs a whole cycle — and the usual culprits are expired demo logins and privacy declarations that don’t match.
What is ASO and why does it matter at launch?
It’s the work of ranking and converting in-store search, which is where a lot of installs start. Your name, subtitle, keywords, icon, and first two screenshots do the job. One thing trips everyone up: iOS hides keywords in a private field and ignores your description, while Google Play indexes the description itself. Same copy in both places wastes both.
What is a good retention rate for a new app?
There isn’t a universal number — category changes it too much for benchmarks to help. Watch your own day-1, day-7, and day-30 curves by install cohort instead. A cliff on day 1 means onboarding. A slow bleed after day 7 means the app runs out of reasons to come back.
What is the difference between a beta test and a soft launch?
A beta asks whether the thing works. You hand it to a limited group through TestFlight or Play’s testing tracks and watch for crashes and dead ends. A soft launch asks whether the business works — real release, real money, real ad spend, just confined to one or two small markets.